Tracks Loaded on Xdj Rx2are Grayed Out
PIONEER XDJ-RX2
SETUP
Firmware & Drivers
Firmware: Update the firmware of the XDJ-RX2 to the latest available version from https://www.pioneerdj.com/en/support/software/xdj-rx2/#firmware-update
Drivers (for both Windows and Mac OSX): Install the latest drivers from https://www.pioneerdj.com/en/support/software/xdj-rx2/#drivers
VirtualDJ Setup
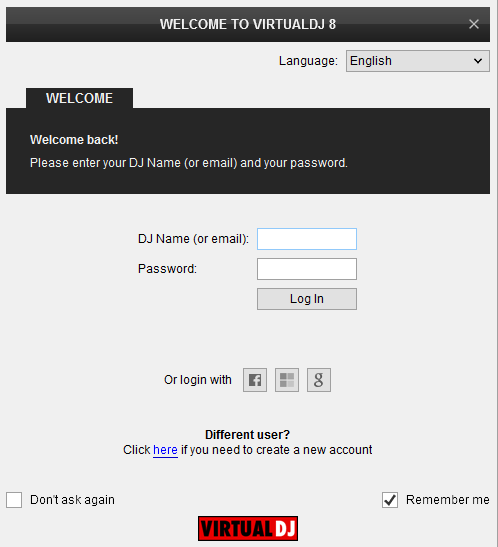
Once VirtualDJ 8 is launched, a Login Window will appear to enter your virtualdj.com account credentials.
A Pro Infinity or a Pro Subscription License is required to fully use the Pioneer XDJ-RX2 Without any of the above Licenses, the controller will operate for 10 minutes each time you restart VirtualDJ.
http://www.virtualdj.com/buy/index.html
Click to OK on both windows


MIDI MODE
On the XDJ-RX2 :
- Press the MIDI button at the left side of the Display
- Press the LOAD 1 button at the right side of the Display
- Press the LOAD 2 button at the right side of the Display
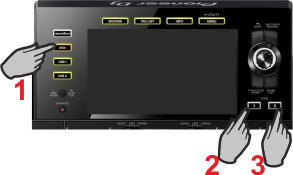
The unit is now ready to operate.
MIDI Operation
The unit should be visible in the CONTROLLERS tab of Config as 2 separate units (one for the main unit and an additional one for the Display) and the "factory default" available/selected from the Mappings drop-down list for both units. The factory default Mapping offers the functions described in this Manual, however those can be adjusted to your needs via VDJ Script actions.

Find more details at http://www.virtualdj.com/wiki/VDJ8script.html
AUDIO Setup
The unit has a pre-defined Audio setup and a special button in the AUDIO tab of Config to provide that.

Alternative audio configurations can be applied See Advanced Setup
For further software settings please refer to the User Guides of VirtualDJ 8.
http://www.virtualdj.com/manuals/virtualdj8/index.html
Refer to the manual of the unit for further features-settings. at... https://www.pioneerdj.com/en/support/documents/xdj-rx2/
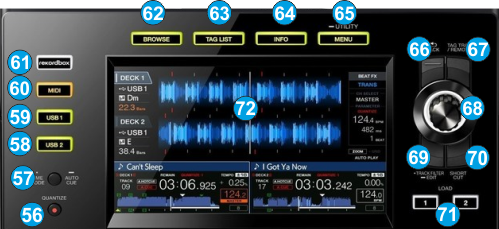
LAYOUT
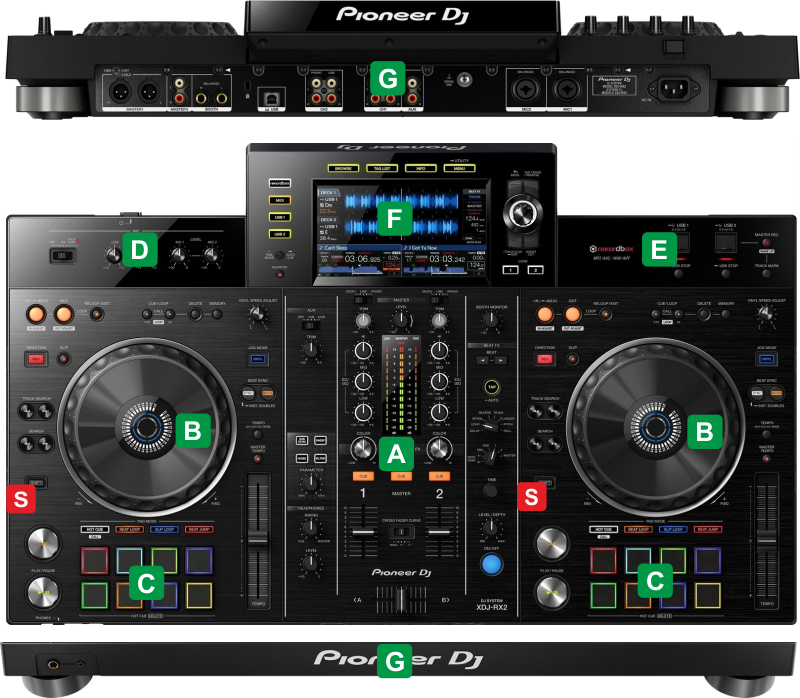
S SHIFT. Hold this button down to access secondary functions of the Pioneer XDJ-RX2. Note that the SHIFT button is not a MIDI button and the SHIFT functions on the unit are limited to the ones available from the unit's firmware.
The functionality of each button, knob and slider per section (as shown in the image above) will be explained in detail in the following chapters
A Mixer & Effects
B Deck Controls
C Performance Pads
D Microphones
E USB Sources
F Browser & Display
G Front & Rear panels
MIXER & EFFECT CONTROLS
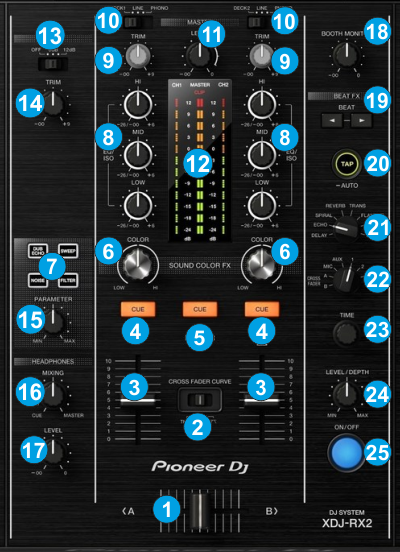
MIXER CONTROLS
Notes: None of the above mixer elements will move the relative VirtualDJ mixer element on the GUI when the Hardware Mixer mode is selected. When the MIDI Mixer mode is selected, Crossfader, Volume faders, EQ and TRIM knobs will control the internal mixer of VirtualDJ and their movements will be shown on the GUI.
See further details about the Mixer modes in the Advanced Setup
EFFECT CONTROLS
The BEAT FX section is used to apply Hardware or VirtualDJ effects to Decks/Master/Mic/AUX-Sampler, depending on the selected Mixer mode. Hardware Effects will be applied when the Hardware mixer mode is selected and VirtualDJ (software) effects will be applied when the MIDI mixer mode is selected.
DECK CONTROLS
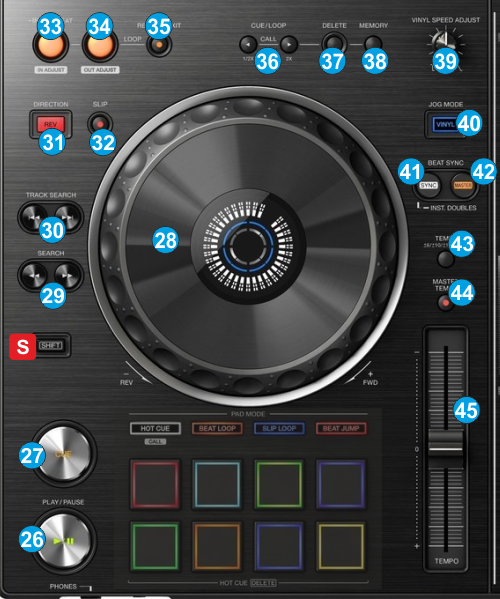
S SHIFT.Hold this button down to access additional functionality for several buttons/knobs as described in this manual.
Hold SHIFT and use the JOG in Seek (Search) mode.
Hold this button down for more than 2 seconds to enable a 4 beats Auto Loop
PERFORMANCE PADS
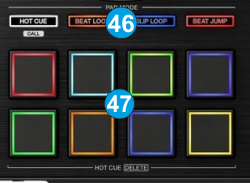
Hold SHIFT and then press any of the 4 available Pad mode buttons to set the Pads to Saved Loops, Sampler, Slicer and Keycue mode.
The Parameters of each mode can be adjusted from the VirtualDJ GUI (Pads section)
Read further details about Pads in the VirtualDJ 8 manual
HOTCUES
Each one of the 8 pad assigns a Hot Cue Point (1 to 8) or jumps the track to that Hot Cue Point (if assigned).
When a Hot Cue Button is unlit, you can assign a Hot Cue Point by pressing it at the desired point in your track. Once it is assigned, the Hot Cue Button will light on.
Hold SHIFT and then press a pad to delete its assigned Hot Cue Point.
.

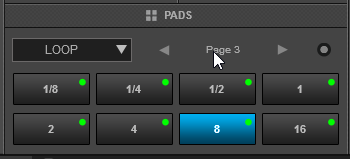
LOOP
Press one of the pads to trigger an Auto Loop of a different size in beats, depending on the selected page. There are 6 different pages available with sizes starting from 1/32 up to 128 beats.
Use the Parameter arrow buttons from the VirtualDJ GUI (Pads section) to select the previous/next page with the desired Loop sizes
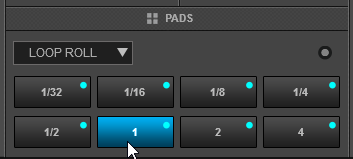
LOOP ROLL
Press one of the 8 pads to trigger a momentary Loop Roll. Once the Pad is released, the track will resume playing from the position it would have been if the Loop Roll was never triggered. The exit point will be visible on the waveform of the VirtualDJ GUI with an additional "running" play marker.
Hold SHIFT to get a ½, ¾, 1 and 2 beats Loop Roll sizes for the 4 low pads.
Use the Page menu to apply the Loop Rolls to Video.
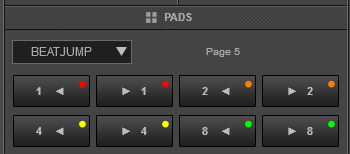
Beatjump mode
In this mode, each one of the Pads will jump the track backwards/forward by the amount of beats depending on the selected page/bank (from 1/8 beats to 32 bars)
Use the Parameter arrow buttons from the VirtualDJ GUI (Pads section) to select the previous/next page with the desired Beats sizes
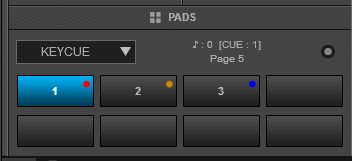
Saved Loop mode
In this mode, the 8 Pads represent a slot where a Loop can be saved. When a slot is empty (Pad is unlit), press a Pad to save and trigger a Loop at the current position. Press the same Pad to exit the loop. When a loop is saved, press the Pad to enable the saved loop and jump to its position if before current track's position.
Hold the same Pad for more than 1 second to delete the Saved Loop.
Hold SHIFT and then press a Pad to load a Saved Loop and jump to its position regardless the current track's position.

SAMPLER
Each one of the 8 pads triggers a sample from the selected Sampler Bank of VirtualDJ. If a bank has less than 9 samples, both sides of the XDJ-RX2 will control the same samples. If a bank has more than 8 samples, the left side of the XDJ-RX2 will control samples 1 to 8 and the right side samples 9 to 16.
Press the pads to trigger a sample. Depending on the selected trigger Pad mode, use SHIFT and the same pads to stop the sample.
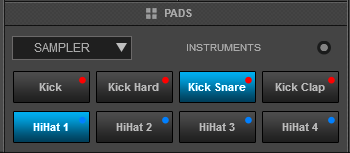
Use the Parameter arrow-buttons from the GUI of VirtualDJ (Pads section) to select the Sampler Bank (previous/next).
SLICER
The 8 pads represent eight sequential beats—"Slices"—in the Beat Grid. The currently playing Slice is represented by the currently green lit pad. The light will move through the pads as it progresses through each eight-Slice phrase. Press a pad to repeat that Slice (hold it down if you want to keep looping it).
Once the Pad is released the track will continue to play from the position it would have been if the pad was never pressed.
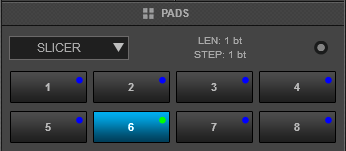
Hold SHIFT and then use the Pads to repeat the memorized Slices (the Slices played/repeated last time)
Use the Parameter arrow-buttons from the GUI of VirtualDJ (Pads section) to adjust the length of the Loop applied to the slice. or adjust the step of the Slices
Key-Cue mode
Hold SHIFT down and then press the BEAT JUMP mode button to set the PADs to KeyCue mode (button will be lit yellow) and automatically load the KeyCue Pads page in VirtualDJ GUI
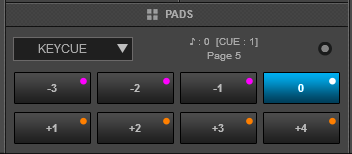
In this mode, the Pads trigger a selected Hotcue point (or the Temporary Cue if none selected or not available) at a selected Key semitone (from -7 to +7).
8 different pages/banks are offered with various semitone values to use and a 0 value (reset key to tis original value) is always offered in all pages.
Hold SHIFT and then select a Hotcue for the Key pads to trigger. Each time a Pad is pressed, the track will jump to that Hotcue point and will also alter the Key of the track to the value designated by it assigned value.
Use the Parameter arrow-buttons on the GUI of VirtualDJ (Pads section) to adjust the Key of the track without trigger a Hotcue.
or select a different page/bank with different key semitone values.
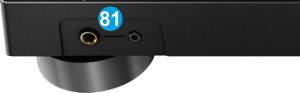
Microphone Inputs
Note that the Microphone Inputs are not part of the USB Audio Interface, thus they cant be included to the Audio Setup of VirtualDJ, and the MIC Controls of the VirtualDJ GUI will not control these inputs (or vice versa).
Microphone Inputs can be recorded along with your mix, only when recording to the USB 2 Source via the MASTER REC button.
USB SOURCES
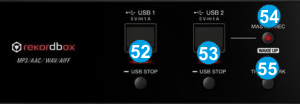
Press the STOP button below this socket, to stop reading its content and eject the Media
Press the STOP button below this socket, to stop reading its content and eject the Media.
This USB connection can be used to record your mix, including any External Source and Microphones
BROWSER & DISPLAY
Hold the same button down for more than 1 second to enable/disable Auto-Cue. When enabled (A.CUE indication on the Display), tracks will load on the 1st available Hot Cue or (First beat if not available)
While the BROWSE view is enabled, press this button to get the Video mode view and select a Video Transition, enable Title, Slideshow and Camera plugins and other Video functions.
Hold SHIFT down and then push the rotary to select the Sideview and view its content on the Display. Hold SHIFT down and then use the rotary to cycle through the available lists of Sideview (Automix, Sidelist, Sampler, Karaoke and Shortcuts)
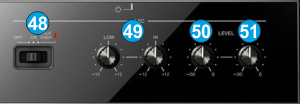
FRONT & REAR PANELS

ADVANCED SETUP
MIDI & HARDWARE MIXER MODES
The Pioneer XDJ-RX2 offers 2 modes for the mixer, the MIDI and the Hardware/RX2 modes. Both are supported in VirtualDJ and have their own special features.
How to select a Mode
Select and load the XDJ-RX2 Settings Pad page. This can be selected from the Pads section of the VirtualDJ GUI, or by pressing the HOT CUE Pads mode button for more than 1 second.

MIDI MIXER MODE
Enable Pad 1 from either the GUI or from the XDJ-RX2 to select the MIDI Mixer mode (default mode). In this mode the Audio setup of VirtualDJ needs to be as Master & Headphones as per the image below.

This Audio setup is the pre-defined (default) and offered when the "Use-Sound Card" button is pressed on the Detection Window or the special XDJ-RX2 button you see at the top of the Audio Setup tab of VirtualDJ Settings.
In this mode :
- The audio mixing is performed from the VirtualDJ mixer, so all the mixer elements such as Crossfader, Volume faders, EQ and Trim knobs control the VirtualDJ Mixer elements (and vice versa)
- The BEAT FX section is controlling the VirtualDJ Effects and the applied effects from this section are software.
- Color FX are applied from VirtualDJ and the COLOR FX Select buttons can be assigned to offer different Color FX via VDJ Script actions (customized mapping)
- Recording can be performed from VirtualDJ (including Video recording), however, Microphone and LINE/PHONO/AUX Inputs are not included in the recorded mix.
HARDWARE MIXER MODE
Enable Pad 5 from either the GUI or from the XDJ-RX2 to select the Hardware Mixer mode . In this mode the Audio setup of VirtualDJ needs to be as External Mixer as per the image below.

This Audio setup is not pre-defined and needs to be manually created as above
In this mode :
- The audio mixing is performed from the XDJ-RX2 mixer, so none the mixer elements such as Crossfader, Volume faders, EQ and Trim knobs control the VirtualDJ Mixer elements (and vice versa). The mixer elements of VirtualDJ will not move when the relative mixer element is moved from the XDJ-RX2.
- The BEAT FX section of the mixer is offering Hardware effects (built-in the XDJ-RX2) , and software Effects can be applied as well from the Effects section of the VirtualDJ GUI
- Color FX are Hardware (built-in the RX2)
- Recording cannot be performed from VirtualDJ.
OTHER SETTINGS
Select and load the XDJ-RX2 Settings Pad page. This can be selected from the Pads section of the VirtualDJ GUI, or by pressing the HOT CUE Pads mode button for more than 1 second.
NEEDLE LOCK
When Pad 2 is enabled (default selection), the Needle is unlocked and you can touch the Song Progress wave and jump to a position on the loaded track.
When Pad 6 is enabled, the Needle is locked and touching the Song Progress will have no effect.
This option is useful to prevent accidental track jumps when the Needle (Song Progress Wave on Display) is accidentally touched
BROWSER VIEW SWITCH
When Pad 3 is enabled (default selection), the Browser view Switch is set to Automatic. In this mode, when a Track is selected and loaded to a Deck, the Decks/Waves view will automatically offered without pressing any other buttons.
When Pad 7 is enabled, the Browser view Switch is set to Manual.and the Browser View will remain active after loading a track and the BROWSER button above the Display needs to be manually pressed to return to the Decks/Waves view.
TRACK SEARCH
When Pad 4 is enabled (default selection), the TRACK SEARCH <</>> buttons on the top panel of the XDJ-RX2 (on each Deck), will load and play the previous/next track from the Browser
When Pad 8 is enabled, the TRACK SEARCH <</>> buttons on the top panel of the XDJ-RX2 (on each Deck), will move the track backwards/forward by 16 beats (Fast Seek)

Tracks Loaded on Xdj Rx2are Grayed Out
Source: https://www.virtualdj.com/manuals/hardware/action/print.html?page=pioneer|xdjrx2
Postar um comentário for "Tracks Loaded on Xdj Rx2are Grayed Out"